qmsm_shape_overlay_editor

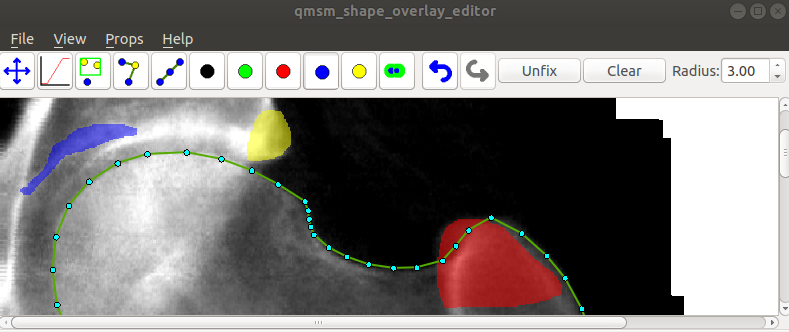
Tool to move points of a shape and draw an overlay on an image.

A tool which allows a user to When multiple images and points are to be viewed or corrected, a file listing all the images+points files can be loaded.
Use the mouse wheel to zoom in and out.
An initial shape and associated curves can be created with the qmsm_markup_tool.

Command line options

Run the tool using either:
qmsm_shape_overlay_editor -i image.png -p points.pts [-c curves.crvs] [-s shape_model.msm]
where curves.crvs is a curves file and shape_model.msm contains an msm_shape_model object (for instance, built by the msm_build_shape_model tool.
or:
qmsm_shape_overlay_editor -l image_list.txt [-c curves.crvs] [-s shape_model.msm]
where image_list.txt is a text parameter file in the following format:
// Define directories containing image and points files
image_dir: images/
points_dir: points/
overlay_dir: overlay/

// Optional directory for additional points (which cannot be moved)
guide_points_dir: ./guide_points/
  
// Optional list of points which are frozen (and thus cannot be moved at all)
frozen_pts: { 0:30  37:47 }

images:
{
  example1.pts : example1.png
  example2.pts : example2.png
  example3.pts : example3.png
}
When this option is used (or such a list is loaded using the "File->Load Image List" option), the tool records the list of images and points, and displays the first one.
You can then step through the images using the left and right arrow keys, or the items on the View menu (for first/last).
If you edit any points, when you attempt to move to another image it will ask you if you wish to save the changes (overwritting the existing file). If you set the "Always Save Points" flag (in the Props menu), then it will always save the points, without asking, when you move to the next image.
Similarly if you edit the overlay, when you attempt to move to another image it will ask you if you wish to save the changes (overwriting the existing file). If you set the "Always Save Overlay" flag (in the Props menu), then it will always save the overlay, without asking, when you move to the next image.

Typical Use: Annotating many images

Designed to enable the user to quickly move through sets of images adjusting both points (previously annotated) and drawing/editing an overlay.
The overlays are assumed to be in the overlay_dir, and to have the same basename as the images, but to have an extension given by the overlay_ext string (which defaults to ".png").
Thus if the image is "123456.dcm", the overlay will be "123456.png".
This is because we may not be able to save as dcm, and it it better to save in a compressed format, such as PNG.
Note also that the overlay file contains only pixel information - it doesn't include any geometry (such as pixel sizes) - so the original image is required to get that if needed.
When moving to a new image, the system should
a) Save the current points to points_dir
b) Save the current overlay to overlay_dir
c) Load the new points if they exist - if not, set points to empty
d) Load the new overlay if it exists - if not, create an empty one
e) If the guide_points exist then load them in too (they can't be moved).
If the warn_on_missing_files option is true, the system will alert the user if files (points or overlays) don't exist.
If the always_save_points is true, then overwrite any existing points file without asking.
If the always_save_overlay is true, then overwrite any existing overlay file without asking.
It is assumed that the main use will be someone going through a list of images adding overlays where required. Thus on the first pass there will be no overlay files. Each image that is looked at will have an empty overlay created for it. To go to the next image without an overlay file (ie that hasn't been visited yet), use the next_missing_overlay option.

Point State

The colours of the points indicate their state.
Unless you have changed them (using the Graph Props), they are as follows:

Manipulating blobs

You can manipulate individual blobs in the overlay.
Right click whilst the mouse is hovering over the blob.
This will show a menu:

Menu Options

File Menu

View Menu

Props Menu

Help Menu

Interaction Modes

Drag Mode Click and drag to move viewport around
Select Mode Press and drag to move a point. Rubber-band box to select groups.
Drag-Shape Mode Click and drag a point to move it. All un-fixed points are dragged around to satisfy shape model constraints.
Equal Space Mode Click on a point to equally space points on the curve through the point, limited by either the ends of the curve or fixed points.
Drawing modes Click and drag to draw in given colour (Black==Erase)
Threshold mode Threshold: Click and drag to threshold in current blob. Drag left to select dark regions. Drag right to select bright regions
The "Unfix" button sets all points to not fixed.
The "Clear" button clears the overlay.

Undo/Redo

The undo/redo buttons allow you to do just that.

Point Manipulation

Translating all the points

To drag all the points at once, either

Rotating/Scaling all the points

Two steps:

Using a Shape Model to guide the points

If you have loaded a shape model, when you are in the Drag-Shape mode it can be used to help move points around.
When you click and drag, any points which are not fixed will be moved around so that they best satisfy the shape constraints. To avoid this being over-constrained (as may be the case when there are few shape parameters available), a residual term is calculated for each point to ensure smooth deformation. This is calculated by performing a weighted least squares fit of the model to the fixed points. Any residual term at each point is recorded, and a Thin-Plate Spline used to propogate the residual to all other points. This is simple but pleasingly effective.

Output formats

Overlays

The overlays are stored internally as a single plane byte image, using one byte per pixel. The value depends on the colour in the overlay, as follows:
0 : Background
1 : Green
2 : Red
3 : Blue
4 : Yellow

Note that if displayed using a normal image editor, the overlay is likely to appear almost blank (as its values will range between 0-4, so close to black). Further processing may be required.