qmsm_guided_markup: A tool to guide point annotation

A tool which guides a user through the annotation process.
It can read in information about which points are required, together with
images demonstrating where the points should be placed.
On each new image the user clicks on the point positions in a specific order.
The tool can also read in an "image list" file, containing a list of the images
to be annotated and the names of the points files to which results will be saved.
Use the mouse wheel to zoom in and out.
If File->GuidedAnnotation flag is set, then it loads in information about the points
to be annotated from a named file (see Setting up the guidance information).
Run the tool use:
qmsm_guided_markup
or:
qmsm_guided_markup -l image_list.txt -g guided_markup_info.txt
where
guided_markup_info.txt is a text file describing the points to be annotated (see guidance)
image_list.txt is a text parameter file in the following format:
// Define directories containing image and points files
image_dir: images/
points_dir: points/
images:
{
  example1.pts : example1.png
  example2.pts : example2.png
  example3.pts : example3.png
}
when this option is used (or such a list is loaded using the "File->Load Image List" option), the tool
records the list of images and points, and displays the first one.
You can then step through the images using the left and right arrow keys, or the items on the View menu (for first/last).
If you edit any points, when you attempt to move to another image it will ask you if you wish to save the changes (overwritting the existing file). If you set the "Always Save Points" flag (in the Props menu), then it will always save the points, without asking, when you move to the next image.
Two things are required to set up the guidance:
- A text file describing the points and guide images
- A set of guide images
Guidance text file
Example:
<b>Right Eye Outside Corner</b> :: <i> Definition of Right Eye Outside Corner</i>:: guide_patches_6pts/patch_00.png
<b>Right Eye Inside Corner</b> :: <i> Definition of Right Eye Inside Corner </i>:: guide_patches_6pts/patch_01.png
<b>Left Eye Inside Corner</b> :: <i> Definition of Left Eye Inside Corner </i>:: guide_patches_6pts/patch_02.png
<b>Left Eye Outside Corner</b> :: <i> Definition of Left Eye Outside Corner </i>:: guide_patches_6pts/patch_03.png
<b>Right Mouth Corner</b> :: <i> Definition of Right Mouth Corner </i>:: guide_patches_6pts/patch_04.png
<b>Left Mouth Corner</b> :: <i> Definition of Left Mouth Corner </i>:: guide_patches_6pts/patch_05.png
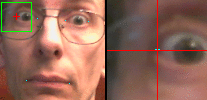
Example image patches
Create an image to help the user locate the point, with a file name to match that in the guidance text file.
You can generate these automatically if you have a representative image and a set of points (eg generated using the qmsm_markup_tool.
Use the following:
qmsm_get_guide_patches -p typical.pts -i typical_image.png -o guide_patches_6pts/ -pwp 0.4
This automatically generates images for each point (like those shown above), and saves them to the named directory.
It also generates a basic guided_markup_info.txt file, suitable for using with
qmsm_guided_markup, which can be editted to add more detailed descriptions of the
points.
The colours of the points indicate their state.
Unless you have changed them (using the Graph Props), they are as follows:
- Cyan: Normal, unselected points
- Yellow: Selected points
File Menu
- Open file list (see below)
- Open Image
- Load Points
- Load Curves
- Save Points
View Menu
- First Image - Move to first image in list
- Next Image - Move to next image in list (or use right arrow key)
- Previous Image - Move to previous image in list (or use left arrow key)
- Last Image - Move to last image in list
- Graph Props - Display panel allowing size/colours of points/curves to be tweaked
Help Menu
- Help: Display summary of functionality
Interaction Modes
 |
Drag Mode |
Click and drag to move viewport around |
 |
Intensity-Windowing Mode |
Click and drag to change the intensity windowing ranges |
 |
Add Point Mode |
Click to add new point |
 |
Add Curve Mode |
Click new position to extend point from currently highlighted point |
 |
Select Mode |
Press and drag to move a point. Rubber-band box to select groups. |
When in "Add Curve" mode, you can link to an existing point by clicking on it.
To start a new curve, click on the currently selected point (to deselect it), then
click in a new position to create a new point and select it. A second click elsewhere
with create a new point and connect to it.
The "Clear" button sets all points to not fixed.
Undo/Redo
The undo/redo buttons allow you to do just that.