Building VXL and UoMqVXL in Windows
Authors: Jon Parkinson, Tim Cootes
The following document explains the steps necessary to compile UoMqVXL libraries and tools using VisualStudio
The CMake software package is available free from cmake.org.
These instructions are based on using Visual Studio 2019 community edition, available free of charge from the Microsoft website.
When installing Visual Studio, ensure that the options for C++ are enabled.
You will need a git tool to download the source code, such as gitbash.
Qt5
GUI components are provided by the Qt5 package, available from the Qt website.
There are two options available, open source and commercial. Install the open source version.
Once you have downloaded and run the qt-unified-windows-x86 executable, when you have logged in, you will be presented with a number of options.
The required options are as follows:
- Developer and Designer Tools (automatically selected)
- Qt 5.12.3 MSVC 2017 32-bit (for 32-bit compilation)
- Qt 5.12.3 MCVC 2017 64-bit (for 64-bit compilation)
- Deselect all other options under Qt 5.12.3 (this was the most current version at the time of this tutorial. Use the version as appropriate)
Once the installation process has completed, the appropriate bin directory needs to be added to Windows enviromental variables path.
This will be the binary directory in the Qt5, 5.12.3 directory. For instance, the 64-bit Qt might be located at D:Qt\Qt5\5.12.3\msfv2017_64\bin.
I recommend a directory structure such as this:
(home)/code/vxl_qt5/vxl  - The source code
(home)/code/vxl_qt5/bin  - The compiled code
If using gitbash, use unix commands to navigate to the code/vxl_qt5/vxl directory,
and run:
git clone https://github.com/vxl/vxl.git vxl
For developers: Move to the vxl directory and run:
./scripts/setup-for-development.bash
From within the VXL source tree (e.g. (home)/code/vxl_qt5/vxl), install the public libraries.
Note, if you have a sourceforge account (mySFname), use:
git clone ssh://mySFname@git.code.sf.net/p/uomqvxl/code/ uomqvxl
Otherwise, use anonymous checkout:
git clone git://git.code.sf.net/p/uomqvxl/code uomqvxl
Create a text file called CMakeListsLocal.txt within (home)/code/vxl_qt5/vxl.
Edit it, adding the lines
SET(UoM_QT_VERSION "5")
SUBDIRS(uomqvxl)
The first part of the compilation process is carried out via CMake.
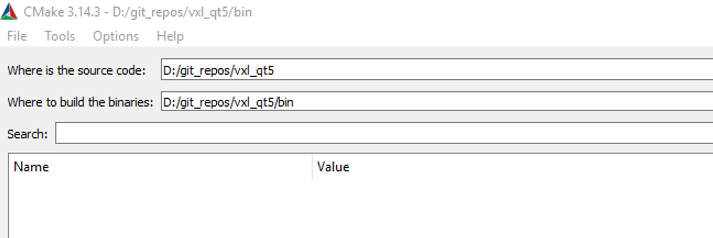
Run the CMake tool, then
- Set the source code directory to wherever the VXL source code is located
- Set a directory for the binaries to be stored in - see the figure below:

When these options are set, press ‘configure’.
If the build directory for the binaries hasn’t already been created, the option for this be done automatically will be offered.
In my case , the generator for the project is automatically selected as Visual Studio 16 2019.
If a 32-bit executable is required, manually set the ‘optional platform for generator’ option to Win32. The default, as per the image below, is 64-bit.
Leave all other options as they are and select ‘Finish’:

Once the initial configure process has completed, there will be some errors.
The following changes need to be made using the options available in the CMake window.
Note that some options are not on screen unless the ‘Advanced’ check box in the top right of the CMake window is selected.
The process is done in stages as some options don’t become available until prior options have been configured:
- VXL_BUILD_CONTRIB: ON
- CMAKE_CONFIGURATION_TYPES: Release (delete all other options)
- VXL_BUILD_DCMTK: ON
- VXL_FORCE_V3P_DCMTK: ON
With these options selected, run 'configure' again.
Once completed, make the following changes:
- VXL_BUILD_GEL: OFF
- VXL_BUILD_OUL: OFF
- VXL_BUILD_OXL: OFF
- VXL_BUILD_PRIP: OFF
- VXL_BUILD_RPL: OFF
- VXL_BUILD_TBL: OFF
Once these options have been entered, press configure for the final time.
Once the configuration process has completed, press the 'Generate' button.
When generate has finished, the project can be launched automatically by using the 'Open Project' button, which in my case loads up Visual Studio 2019.
With Visual Studio loaded up and on screen, simply find the tool you wish to build in Visual Studio's solution explorer window and right click on the appropriate entry.
This will build the executable and place it in the appropriate Release directory.
The location of the new .exe file will differ depending on your set up, but will usually be found at (home)/code\vxl_qt5\bin\bin\Release.
As Visual Studio automatically installs itself as administrator, unless this has been changed, any executables will need to run as administrator within windows.

